

AR Build Guide – Building An AR 15 From Scratch
Building an AR-15 is a common thing to do and it is no surprise that you will want to build an AR-15 from scratch. However, not everyone has a good idea of where to begin. This is why we composed this guide to teach you all the things you need to know when building an AR-15.
In this guide, we will be teaching you how to put together a standard AR-15 with a 16” barrel, chambered in 5.56 or .223. This setup is just about the gold standard for most rifles and the best part is, you will be able to customize it further if you intend to in the future.
Besides teaching you how to build an AR-15 rifle, we will also be answering some relevant and frequently asked questions at the end of the guide. But first, we will be taking a look at the important things you need to pay attention to before you build your AR-15.
After that, we will explore the full list of parts you need to build an AR rifle, including the best parts for an affordable and well-rounded rifle. Finally, we will show you the different types of ARs and calibers that you can build on your own too. With that said, let’s begin our guide.
The Criteria – How To Build An AR-15 From The Ground Up?
It is understandable that you want to jump right into building your AR-15 immediately after you buy the parts. However, it can be devastating if you mess things up, or even worse, injure yourself during the build. This is why it is crucial that you remember the things that we’ll be talking about.
Safety
No matter what, always remember to keep yourself safe first. There is no point in building the perfect AR-15 but not be able to enjoy it because you injure yourself during the process.
To keep yourself safe from harm, remember to wear glasses or goggles because there is a high chance that the pins and springs will fly across your workspace and the last place you want them to end up in is your eyes. Wearing a shop apron is also recommended to protect your clothing.
Work Surface
You will be spending most of your time assembling the gun on a work surface and it is necessary to make sure that you assemble in a space with sufficient lighting and has enough clear and clean workbench area.
Place a mat on your work surface and if you don’t have one, we strongly recommend you to get one. The mat will prevent the parts from rolling around and going missing and can also protect your guns and parts from damages or scratches.
Floor Area
Like we’ve mentioned earlier, the pins and springs are likely to end up all over your workspace and it won’t be surprising to see them end up on your floor. This is why it will be extremely helpful if you maintain a clean floor or have a white towel covering the floor.
That way, it will be much easier to search for these small parts if they do fall off the table. The last thing you want is to delay your build because of a missing $0.99 roll pin.
Tools
If you want the perfect AR-15, you will have to carry out a professional job and that calls for the use of proper tools. We strongly suggest you to not ignore this part because the quality of your work hangs in the balance. Make sure you use the right tool for the task and use brass punches whenever possible to prevent marring the finish.
The Full List of AR-15 Parts You Need To Building An AR

Now that you know the preparation before the build, let’s look at all the AR-15 parts you will need to successfully complete the build. Regardless of the configuration or caliber, the AR-15 can be separated into two main components, the upper receiver assembly and the lower receiver assembly.
Assembly and fitting of parts to the lower receiver is required but before we get there, let’s have a look at the upper receiver parts first.
Upper Receiver Parts
Here is a list of the parts you will need for an upper receiver:
- Barrel
- Gas tube
- Gas block
- Hand guard
- Charging handle
- Bolt carrier group
- Stripped upper receiver
Most upper receivers with a barrel include their own build kits and they ship them out to their customers preassembled so it will be ready to fire. If you want to make your first AR-15 build easy, you can also go for those with all the parts assembled and properly configured. You should also note that a certain type of upper receiver might not contain all the mentioned parts.
Lower Receiver Parts
Here are the parts you will need for a lower receiver:
- Stripped lower receiver or 80% lower
- Lower parts kit with trigger assembly
- Buffer
- Buffer tube
- Buffer spring
- Buttstock
These lower parts are pretty standard for when you build an AR rifle and there are many aftermarket upgrades available as well.
How To Choose The Best AR-15 Upper Receiver Parts?
With a better idea of the components required for upper receivers, let’s take a look at how you can choose these parts wisely. This is especially crucial because it shapes how your gun looks and feels. These parts are not considered firearms so once you’ve made your choice, you can just order them and have them shipped to your place without going through any paperwork.
Selecting the Right Barrel
It is undeniable that barrels are the most important part of an AR build. It will dictate the accuracy of your gun, how far you can shoot and also the types of rounds you’ll be shooting.
However, finding the right barrel can be quite a hectic task but don’t worry because we’ve made it easy for you.
By considering the following things, you will be able to choose the ideal barrel for your build. The things that you’ll need to think about are the construction (type of material), its finish (type of coating or treatment), the lining (chrome-lined or not), length (affects the velocity) and twist rate (decides the type of rounds you’ll be shooting).
Construction/Material
The three common types of gun steel that manufacturers use to make AR-15 barrels are: 4140 Chromoly, 4150 Chromoly Vanadium (CMV) or 416R stainless steel. Normally, manufacturers use 4150 CMV for making a barrel because it gets the barrel as close to “mil-spec” as possible.
On the other hand, a 416R stainless steel barrel will be the most accurate, while a 4140 Chromoly barrel is the most affordable option but still works like a charm.
Finish
The next crucial aspect of a barrel is its finish. Standard barrels usually come with a Melonite or anodized coating, and both coatings provide a matte black finish to guard the barrel from rust and corrosion.
As for stainless barrels, they come without any finish because the material is naturally rust and corrosion resistant. If maintained properly, a stainless barrel can last just as long, if not longer, than a CMV or Melonite-treated barrel.
Chrome-lining
Chrome-lining is the process where barrels get their rifling lined with chrome. This is to extend the barrel life and also provide protection against heat. The other alternative to chrome-lined barrels are Melonite-treated barrels as they usually provide better performance.
A barrel with chrome-lining will have slightly poorer accuracy but it does increase the barrel performance under rapid-fire.
Barrel length
The barrel length isn’t something clear cut and direct, but for simplicity sake, let’s assume you’ll be building a traditional 5.56/.223 AR-15. In order to obtain the ideal velocity while meeting the minimum legal barrel length, we strongly recommend going for a 16” barrel.
This length is ideal for achieving a velocity of about 2,940 feet per second using Federal 62-grain 5.56 ammo. If you place them side by side, a barrel with a length of 20” only increases the velocity by approximately 120 feet per second only. Therefore, a 16” barrel would be the most ideal.
Twist rate
The twist rate of barrels is a ratio that shows how far the bullet needs to travel in one complete turn. In other words, it is also how frequent the rifling completes a full rotation. Twist rates of AR-15 rifles range from 1:12 to 1:7.
A twist rate of 1:7 would mean the bullet completes a one full rotation for every seven inches travelled. The twist rate that we recommend would be 1:7 or 1:8 because these are the best twist rates to chamber the standard 5.56 and .223 loads.
Selecting a Gas System
The gas system of your gun determines how the rifle cycles and feeds the ammo. Normally, an AR-15 works using direct impingement which involves sending extra gas through the barrel, into a gas tube and back into the upper receiver.
The gas is then forced into a key above the bolt carrier group which forces it backwards. As the BCG moves back, the used cartridge will be ejected and a new round is chambered to fire.
Generally, there are four types of gas systems for an AR-15, which are pistol, carbine, mid-length and rifle gas systems. Each gas system is meant for a different span of barrel and also has a distinctive gas block distance.
Pistol
The pistol gas system is the shortest among the others and is meant for barrels shorter than 10”, with a 4” gas block distance. This is not recommended if you’re building a standard AR-15. Instead, it is meant for unique builds which we will not be covering in this guide.
Carbine
The carbine gas system is the most common option for an AR-15 as it can handle 5.56 or .223 rounds with great reliability. It is meant for barrels from 10” to 18” and has a gas block distance of 7”. If you’re going for a 16” AR firearm, then the carbine gas system would be ideal.
Mid-length
This gas system is slightly longer and is meant for barrels from 14” to 20” and has a gas block distance of 9”. This is similar to a carbine gas system where it can reliably handle 5.56 or .223 cartridges. Hence, this is also recommended for 16” barrels.
Rifle
This is the longest and is ideal for barrels that are more than 20”. It also has a 12” gas block distance and isn’t applicable for the AR-15 we are building in this guide. This is usually meant for an AR-15 with a marksman-style or a 20”-long bench rifle made for firing custom ammunition.
Selecting a Handguard
Generally, there are two types of handguards available, free-float and drop-in. A free-float handguard means it doesn’t attach to the barrel or the gas block, while a drop-in handguard attaches to the gas block or front sight post of the AR-15.
The free-float handguard offers better accuracy as it reduces stress on the barrel, but it doesn’t rely on pressure or tension to secure itself so it feels less secured. In contrast, a drop-in handguard gives a tighter fit as it attaches to the gas block or front sight post, but it affects the accuracy slightly.
Besides handguards, there are also attachment systems you can choose. The attachment systems are Picatinny, Keymod and M-Lok. Having these attachment systems enable you to attach accessories like sights, flashlights and lasers to your AR-15 handguard.
However, if you opt for a flat-face handguard that is meant for precision bench rifle, there will be no attachment slots because the handguard is meant to give an ergonomic and smooth grip without the disturbance of accessories or sharp things.
Handguards and Gas Lengths
Regardless of the handguard you pick, it is crucial to make sure that it matches the gas system of your AR-15. Handguards usually come with a description stating whether they are designed for carbine, mid-length or others.
If the handguard you choose is too short, your gas tube and gas block will be exposed. However, there’s no problem choosing a handguard that is lengthier than the gas lengths especially if you want the additional room. In that case, you’ll need a free-float handguard that doesn’t attach to a gas tube or block.
Bolt Carrier Groups and Charging Handles
Thankfully, a bolt carrier group (BCG) is universal in the AR line. When you build a standard 5.56/.223 firearm, it pretty much comes down to choosing between an AR-15 BCG, an M16 BCG or a full-auto BCG.
We hate to rain on your parade, but using an M16 BCG will not convert your semi-auto firearm into a fully automatic weapon. The differences between the bolt carrier groups is just their size and the material used at the back of the bolt carrier group.
As for charging handles, they are pretty standard too. You can opt for a specialty charging handle with extended grips but other than that, almost all the charging handles have the same function and are good enough to get the job done.
Types of Upper Receivers On the Market
When you build an AR-15 rifle, it is crucial to think about the function of your rifle. Once you’ve identified whether you will be using the rifle for hunting, competitions or casual shooting, it will be easier for you to choose the parts and most importantly, the upper receiver you will be using.
Generally, all uppers are identical for an AR-15 chambered in 5.56/.223. No matter what style of receivers you choose, they will usually be compatible with all barrels, tubes and BCGs. However, if you want to build your AR for other calibers like 9mm, .308 or 6.5 Creedmor, you will need to choose the receivers carefully.
Upper receivers are usually made of billet 6061 T6 aluminum or forged 7075 T6 aluminum. Choosing the ideal stripped upper is all about personal preference, the kind of sights you want to use and how you want the rifle to look like. Keep reading to find out more about the variations of the AR-15 upper receivers.
A1 Upper
This upper has a permanent carry handle, a shell deflector and it calls for the installation of a forward assist and ejection port cover assembly. You are also required to install an A1 sight assembly to enable the adjustment of windage. It is the best receiver for building a “Retro” civilian model of the Vietnam era M16 rifle.
A2 Upper
This is similar to the A1 upper in the sense that it has an integrated carry handle and a shell deflector. It also requires you to install the forward assist and ejection port cover assembly. Additionally, it features a sight mount to allow you to install an M16 rear sight for the adjustment of windage and elevation. This is ideal if you want to build a “mil-spec” M16 clone.
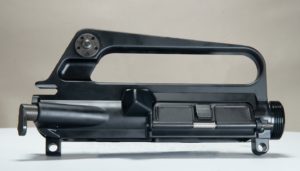
A3 Upper
An A3 comes with a Picatinny rail and shell deflector but there’s a need for you to install the forward assist assembly and ejection port cover assembly. This is also the receiver that military personnel use and many people use it to build a civilian version of the M4 or M16A4. Besides an AR-15 build, you can also use this for a varmint or target carbine/rifle since a scope can be mounted easily.
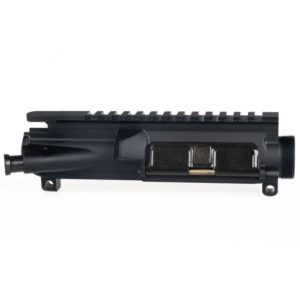
Flattop Upper
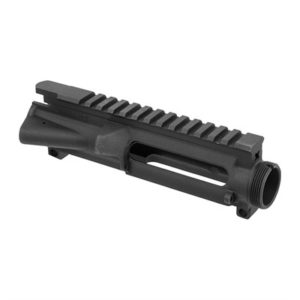
The flattop upper is similar to the previous one and is also the most common stripped upper receiver you can find on the market. The use of this is also common for custom-built AR-15 rifles because you can easily get a sight or scope installed on the Picatinny rail. There are a handful of other options that can be mounted on the rail as well.
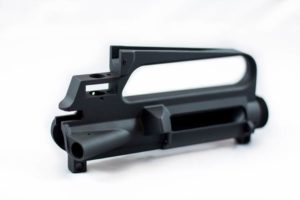
Basic Upper
This is another stripped choice and is usually the most affordable and extremely lightweight because there are no components included. The basic stripped upper is basically a stripped-down M4 model without any forward assists. People use this stripped receiver because it is much lighter and has a simpler design compared to other options.
Choosing The Lower Receiver
Now that you are familiar with the components needed for upper receivers, it’s time to move on to selecting a lower receiver so that you can successfully build your AR-15. At this point, you will have to make a decision about whether to get a stripped lower receiver from the gun store or buy an 80% lower and make your personal stripped lower receiver.
Stripped Lower Receiver
A stripped lower receiver is obviously an easier choice because you only need to buy one and assemble the parts together. Unfortunately, if you go for this, there is a need for a background check and you need to pay extra fees to the state and the federal government. Plus, you might need to deal with extra taxes as well.
80% Lower
An 80% lower or some might refer to it as 80 lower, is a receiver blank and practically an unfinished firearm that requires extra fabrication to be operable. 80 lowers are not made to accept a trigger or lower parts kit until completed, which is why you can’t fire it. As a result, an 80 lower isn’t considered as a firearm by the ATF.
How to Choose The Best Lower Parts Kit?
After making your decision on the lower receiver you want to get, let’s check out the lower receiver parts kit. This is another thing that you can find and purchase easily because most AR-15 rifles that are chambered in 5.56/.223 all use an identical lower parts kit. Anyways, here are the components that all kits need to include:
- Grip
- Safety
- Trigger
- Hammer
- Bolt catch
- Buffer retainer
- Magazine catch
- Takedown pins
These are only the major parts and components of a lower parts kit because there are other smaller and numerous components like a spring, pins and other small bits. You should note that the trigger is the most essential part that you need to consider.
Buffer Assembly
In a buffer assembly, you will discover a buffer tube, spring, buffer and buttstock. The use of a buffer is to control the recoil of bolt carrier groups. Whenever you see the labels “commercial” or “mil-spec” on a lower receiver, it refers to the diameter of the buffer tube. A commercial lower receiver uses a 1.17” outer diameter buffer tube housing, whereas a mil-spec lower receiver uses a 1.14” outer diameter buffer tube housing.
For a regular 16” AR-15 rifle chambered in 5.56/.223, the standard buffer tube, or sometimes known as carbine tube, will suffice. The buffer tube has a measurement of about 7” and you need a regular buffer and spring. The buffer will normally weigh 3.0 oz. so be sure to check the weight when you’re buying a buffer.
What Do You Need To Build AR-15’s Final Assembly?
With the buffer assembly settled, you will have all the things you need to build your AR-15 and you can put the parts together to achieve your first AR-15. Since it’s your first AR-15, you will need to be familiar with the tools and don’t worry, we’ll go through it shortly.
If you went for pre-built uppers, then the assembly will be much easier. But regardless of which, the tools that we’re about to mention will still come in handy to assemble the lower receiver and parts kit.
Roll Pin Punch Set
A roll pin punch set is normally included in a parts kit but the kit calls for the use of special punches for getting them seated. And trust us when we tell you, you don’t want to try it in the absence of this tool because you will very likely send them flying around your workspace if you utilize a screwdriver or a nail.
Armorer’s Wrench
The next tool you’ll need is an Armorer’s Wrench. This tool will be extremely helpful for installing your buffer assembly and handguard. Plus, you’ll definitely need the Armorer’s Wrench if you are installing your own barrel for your upper receiver.
Other AR Builds
Now that you have the parts and instruments settled, it should be an easy task for you to piece everything together accordingly. Besides that, our guide has also provided some other ARs that you can build as well.
AR-9 Pistol
This is something that you can consider because the AR-9 pistol uses quite a number of AR-15’s parts, but it also has its own proprietary components. A typical kit, lower receiver and buffer system can be utilized for building an AR-9 pistol. However, a buffer tube won’t be needed since a 9mm AR-9 pistol is blow-back operated.
The AR-9 pistols have a special BCG that can fit inside a classic stripped AR upper receiver but works with barrels for the AR-9. You will also notice that their BCGs and lower receivers are compatible with the Glock and Colt SMG magazines.
LR-308 Rifle
This rifle is commonly known as the AR-10 but it really isn’t. It is basically AR-15s with a .308 Winchester or 7.62x51mm NATO chamber. LR-308 rifles have an exterior and function that is identical to the original ArmaLite-10, but their receivers are distinctive which calls for the utilization of LR-308 components. The other name for the parts are also known as DPMS .308 components.
.300 Blackout AR-15s
It is not a big deal to swap AR-15s from 5.56/.223 to 300 Blackout. The .300 Blackout round is extremely versatile and unsurprisingly the .300 Blackout round can be fired supersonic, subsonic, suppressed or unsuppressed. To change AR-15s to .300 Blackout, all you need are new barrels for the right cartridge. Everything else including the upper and lower receivers, the kit, BCG and magazines are the same.
Conclusion
It would be great if this guide has helped you and provided you with some useful information so you can construct your own AR-15 at home. Feel free to watch some videos online if you experience any difficulties or hiccups during your construction. Or you can ask for help from the local gunsmith. Just be certain to do each step right so you can enjoy the ideal AR rifle.
Frequently Asked Questions (FAQs)
What are the differences between cast, billet, and forged receivers?
Forged receivers are molded by being hammered to the specific shape while it is piping hot which similarly goes to cast receivers. On the other hand, billet receivers are originated from a single metal block. This allows it to be more sturdy, stronger, durable. However, billet receivers would cost significantly more but given the better aesthetics – I’d say it’s worth if aesthetics is your priority.
Is building an AR-15 at home legal?
Yes. However, there are some limitations placed by the ATF. It is perfectly legal to assemble your own AR-15 at home for personal utilization. But if you intend to construct a short-barreled rifle (SBR), you will need specific paperwork since it is considered an NFA.
Do I need an FFL or background check?
Depends. For anyone that plans to construct AR-15s with stripped lowers, they will need to go through an FFL, fill out some documents and run a background check. On the other hand, for anyone that is constructing their rifle with an 80% lower receiver, there will be no need for any of those.
However it is not applicable for every state, so make certain you check the local and state laws first before you begin constructing.
Do AR-15s need a serial number?
Depends. If you went for a stripped lower receiver, a serial number will be included for the documents and background check. However, if you went for the other selection, there will be no need for a serial number according to the federal law.
According to the ATF, there is no need for a serial number for homemade guns intended for personal utilization. Then again, it is not applicable in every state, so check first before constructing.

Hello there, it’s Michael here. A gun lover since young, served the country for the last 20 years. I started the blog to share my experience and gun-related knowledge accumulated throughout the years. Hopefully, you will find something useful over here or just have fun! You can learn more about me here.